흑흑 인증 뒤지게 어렵다ㅠㅠㅠㅠ
인증과 인가의 차이점, OAuth 원리, JWT란 무엇인지, 세션기반/토큰기반 Authorization, passport 등등에 대하여 공부하고나서,
NestJS 공식문서의 Authentication 튜토리얼을 쭉 따라가면 다음과 같은 결과물이 나온다.
users.service에 다음과 같이 user 정보를 넣어두고
private readonly users = [
  {
    userId: 1,
    username: 'john',
    password: 'changeme',
  },
  {
    userId: 2,
    username: 'maria',
    password: 'guess',
  },
];- /auth/login 경로에 POST 로 id, pw를 넘기면 LocalStrategy에 의해 id/pw 검사가 이루어진다. 일치하는 user 가 반환되면, auth.service 의 login 메서드에 의해 userId와 username이 payload로 포함된 access_token (JWT) 이 반환된다.
- /profile 경로에 이 access_token을 Authorization 헤더에 넣어서 GET 요청을 보내면,
해당 access_token 주인의 프로필 정보를 보여준다. - 이 과정엔 passport-jwt 와 passport-local 패키지가 사용되었다.
👇 튜토리얼을 통해 만든 인증 API의 사용방법
$ # GET /profile
$ curl http://localhost:3000/profile
$ # result -> {"statusCode":401,"error":"Unauthorized"}

$ # POST /auth/login
$ curl -X POST http://localhost:3000/auth/login -d '{"username": "john", "password": "changeme"}' -H "Content-Type: application/json"
$ # result -> {"access_token":"eyJhbGciOiJIUzI1NiIsInR5cCI6IkpXVCJ9.eyJ1c2Vybm... }

$ # GET /profile using access_token returned from previous step as bearer code
$ curl http://localhost:3000/profile -H "Authorization: Bearer eyJhbGciOiJIUzI1NiIsInR5cCI6IkpXVCJ9.eyJ1c2Vybm..."
$ # result -> {"userId":1,"username":"john"}
이 결과물을 기본 구조로 삼아 42OAuth 를 적용해보려고 한다.
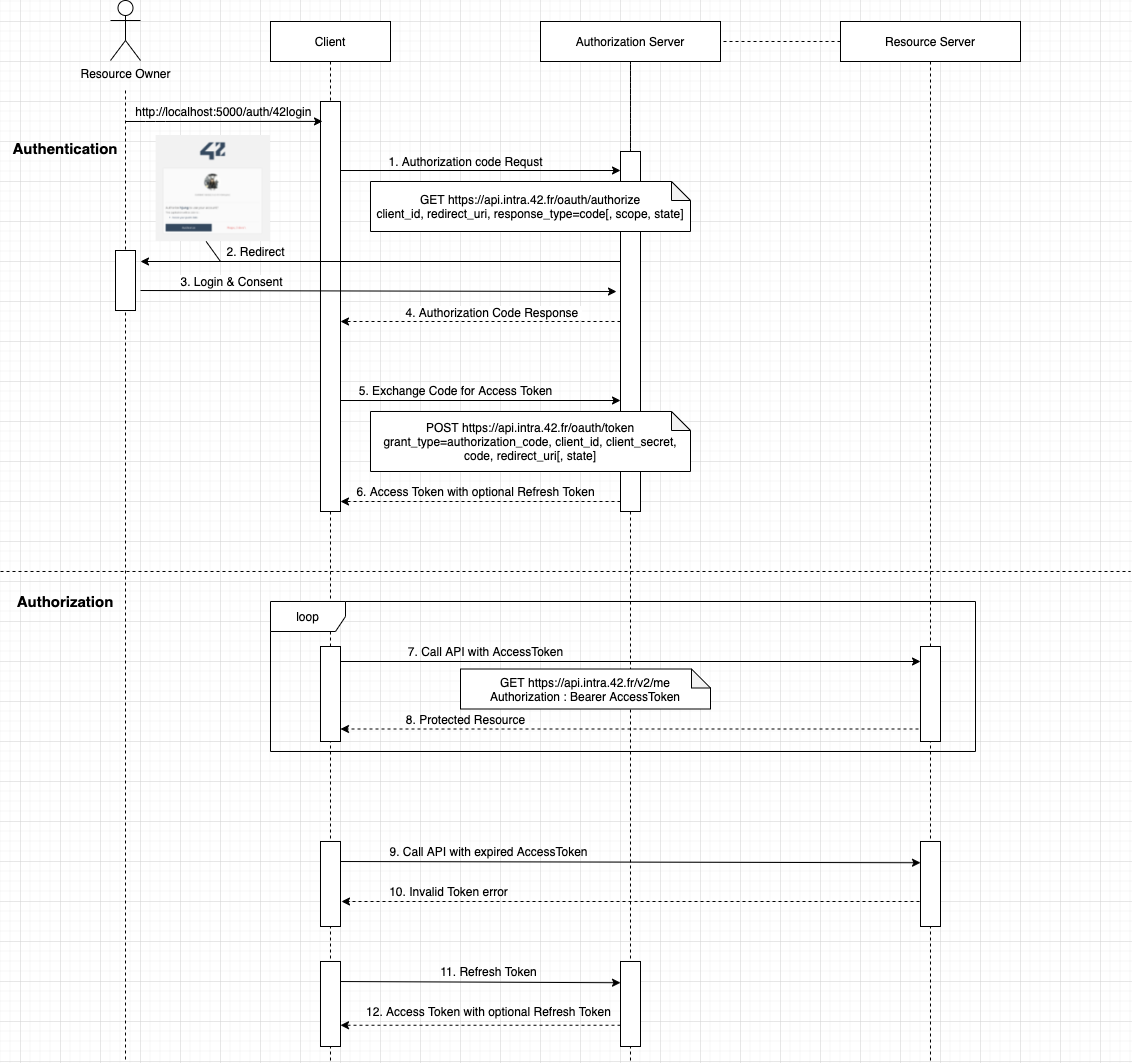
인증을 구현하기 위한 작업순서는 아래와 같을 예정
이 포스팅에서는 굵은 글씨로 된 단계까지만 다룬다.
0. 42intra 에서 App 등록 후 Client_ID, Client_Sercet 발급받기 (설명생략)
1. 42oauth 에서 accessToken 받기
2. accessToken 이용해 리소스에 접근해서 42 intra 데이터 받아보기
3. 유저정보 포함해서 JWT 토큰 발급하기
4. 쿠키에 JWT 토큰 저장해서 활용하기
5. JWT 토큰으로 우리 서비스의 회원인지 확인하기
6. 회원이 아니면 회원가입 프로세스 진행 / 회원이면 로그인
7. Front-End로 일부 프로세스 옮기기
❗️ 42 intra 에서 앱 등록 할 때 redirect uri 를 127.0.0.1 주소로 설정하고, 코드에서 환경 변수를 localhost 로 설정하면 오류 발생함. localhost 로 통일해야함.
1. 우선 passport-oauth2 패키지를 이용해 42API에서 access token을 받아보자.
먼저 FortyTwoStrategy 를 작성해야한다.
우리가 사용할 passport-oauth2 패키지의 메뉴얼을 보면 strategy를 다음과 같이 작성하라고 나와있다.
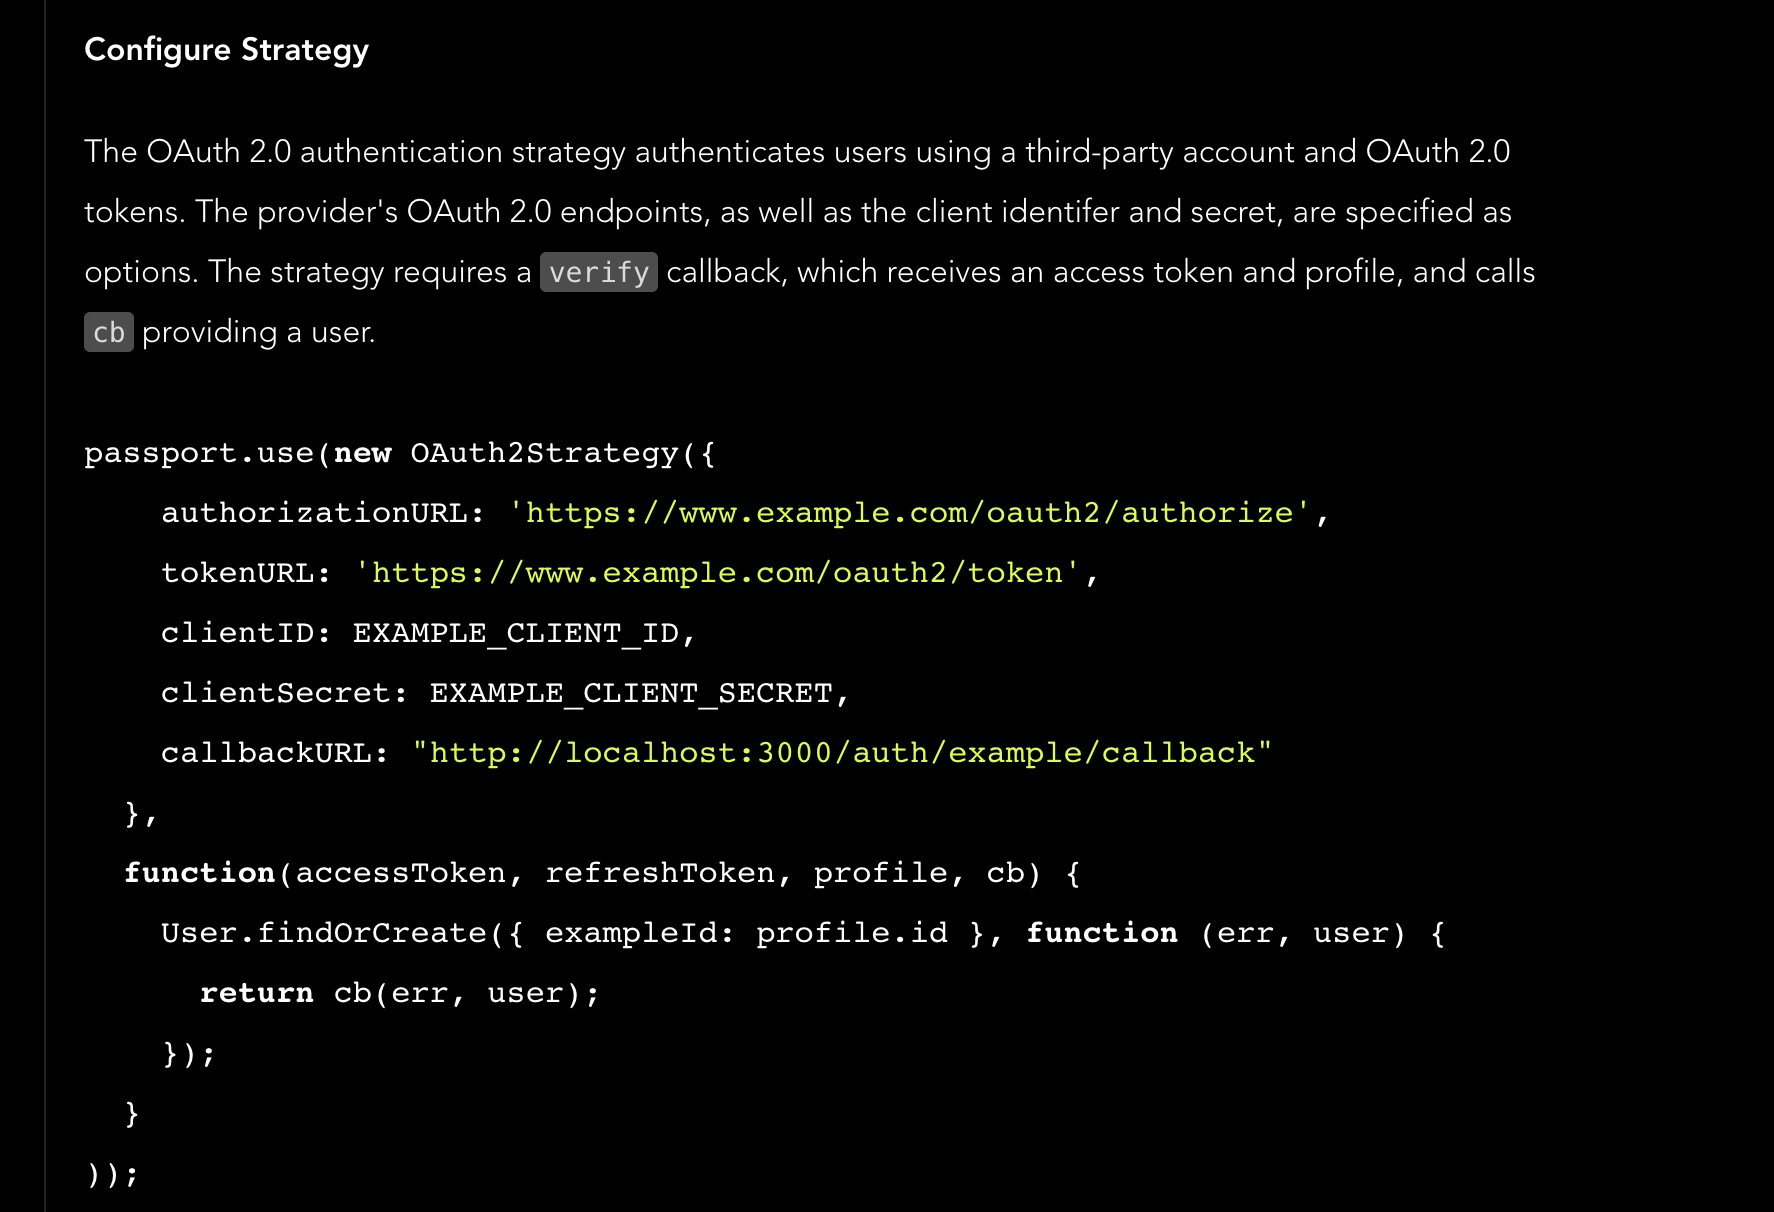
넘겨주라는 애들을 super()에 넘겨주고 받은 token을 validate() 메서드에서 출력해봤다.
❗️메뉴얼 코드 복사해와서 값만 바꾸다가 tokenURL에 'https://api.intra42.fr/oauth2/token' 이렇게 넣어서 Failed to obtain access token 에러 발생 ... oauth2 가 아니고 oauth 다.
겨우 오타 때문에 발생한 오류 원인 찾느라 2시간 날림 ㅠㅠㅠㅠ
//ft.strategy.ts

import { Injectable } from '@nestjs/common';
import { ConfigService } from '@nestjs/config';
import { PassportStrategy } from '@nestjs/passport';
import { Strategy } from 'passport-oauth2';

@Injectable()
export class FortyTwoStrategy extends PassportStrategy(Strategy, 'ft') {
  constructor(configService: ConfigService) {
    super({
      authorizationURL: `https://api.intra.42.fr/oauth/authorize?client_id=${configService.get<string>(
        'ft.client_id',
      )}&redirect_uri=${configService.get<string>(
        'ft.callback',
      )}&response_type=code`,
      tokenURL: 'https://api.intra.42.fr/oauth/token',
      clientID: configService.get<string>('ft.client_id'),
      clientSecret: configService.get<string>('ft.client_secret'),
      callbackURL: configService.get<string>('ft.callback'),
    });
  }

  async validate(accessToken: string, refreshToken: string) {
    try {
      console.log('accessToken: ', accessToken);
      console.log('refreshToken: ', refreshToken);
      return accessToken;
    } catch (error) {
      console.log(error);
    }
  }
}
이제 작성한 Strategy를 적용하기 위해 FortyTwoAuthGuard 를 작성한 후 /auth/42login 경로에 적용해준다.
//ft-auth.guard.ts

import { Injectable } from '@nestjs/common';
import { AuthGuard } from '@nestjs/passport';

@Injectable()
export class FortyTwoAuthGuard extends AuthGuard('ft') {}
// auth.controller.ts
import { Controller, Get, Request, UseGuards } from '@nestjs/common';
import { FortyTwoAuthGuard } from './guards/ft-auth.guard';
@Controller('auth')
export class AuthController {
@UseGuards(FortyTwoAuthGuard)
@Get('42login')
async login42(@Request() req) {
return 'success';
}
}마지막으로 Dependency injection 을 잘 해주고나서 http://127.0.0.1:5000/auth/42login 경로에 접근해보면, AccessToken을 무사히 가져오는 모습을 볼 수 있다.

2. AccessToken 을 이용해 제한된 리소스에 접근하기
비동기함수로 axios 를 쓰는 방법과, RxJS라는 비동기 라이브러리를 쓰는 방법이 있다.
일단 RxJS 를 활용하는 방법을 써봤는데, 뭘 사용할지는 팀원들과 상의해봐야할 것 같다.
validate() 메서드는 controller에 있는 AuthGuard에서 strategy 의 유효성이 확인된 후 실행되는 메서드이다.
// ft.strategy.ts
import { HttpService } from '@nestjs/axios';
import { lastValueFrom } from 'rxjs';
//...
async validate(accessToken: string, refreshToken: string) {
    console.log('accessToken: ', accessToken);
    console.log('refreshToken: ', refreshToken);
    // HttpService 는 Observable 을 반환한다.
    const req = this.http.get('https://api.intra.42.fr/v2/me', {
      headers: { Authorization: `Bearer ${accessToken}` },
    });

    try {
      const { data } = await lastValueFrom(req);
      if (!data) throw new exception();
      console.log(data);
      return data;
    } catch (error) {}

    throw new UnauthorizedException();
  }
  //...
여기까지는 42OAuth 만을 이용해서 accessToken을 받고, 42api에서 제공해주는 정보에 접근해봤다.
이렇게 우리 서비스를 사용하려는 유저가 42 intra 회원인건 인증되었다. 이젠 이 유저를 우리 서비스의 회원으로 등록해야한다.
아니 사실 42OAuth 인증을 하기 전에, 우리 서비스의 회원인지 먼저 확인해야한다.
어떻게 하지?
다음에 계속
'공부기록 > 42 Seoul' 카테고리의 다른 글
| NestJS + PostgreSQL + TypeORM CRUD (0) | 2021.07.26 |
|---|---|
| Transcendence 공부 리소스 (0) | 2021.07.11 |
| 42 과제에서 배운 것 정리 (0) | 2021.05.29 |
| [ft_services] nginx 설정 (0) | 2021.02.01 |
| [ft_services] MetalLB 설정 (2) | 2021.01.19 |


